The Punchout Integration tab is where you can configure site-level settings for integration with punchout buyer systems (such as Ariba or Coupa). cXML is an XML standard used to transfer data between the buyer’s application and the supplier’s website during a punchout session. Punchout is a software architecture that makes it possible for a buyer to access a supplier’s website from within its own procurement application. The buyer leaves (“punches out” from) their system and goes to the supplier’s web based punchout catalog (catalog-level punchout) or to specific products (product-level punchout) to select and order products, while their application transparently maintains connection with the website and gathers pertinent information. Example: Ariba Buyer is a procurement website that enables registered buyers to punch out to your site.
Note: A vendor catalog that is enhanced for this process is known as a punchout Catalog.
Note: This product-level punchout is a licensed option Punchout Buyers.
Note: Digital Download products are not currently supported in product-level punchout.
In product-level punchout, buyers who click a deep link to a product on your site from the procurement system are taken directly to the Visual Product Builder page (instead of to the storefront as in catalog-level punchout) where they can begin configuring the product.
Note: When buyers select a link to a matrix product or a kit product, they will be taken directly to the appropriate page to begin selecting options for the product. For products that require no configuration only quantity (e.g., non-printed products and static products without ticketing options, buyers will be taken directly to the product details page.
Note:
Order Tracking and Reporting for Punchout Products
When
buyers punching out of a procurement application (such as Ariba) place
orders for two or more punchout products in your site, multiple orders
will be created in your site (one order per product; these multiple orders,
however, will be identifiable by the PO Number sent to your site from
the procurement application). Note
that currently no reports can be generated in your site to determine which
orders were in the same punchout cart of the procurement application.
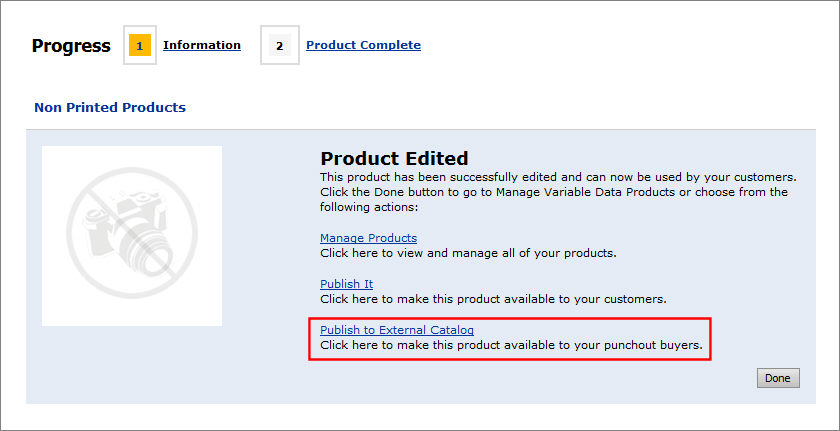
To make a product available to punchout buyers, you must:
1. ensure that the product has a product ID (SKU) that is identical in both your site and on the procurement site (e.g., Ariba)
2. publish the product
to the external catalog:

Note: Punchout buyers are assigned to a default group, company, etc. For more information, see the topic Punchout Buyer Management.
Note: Buyers can cancel a job in
progress in your site only in the procurement system. That is, they will
not be able to cancel the job in progress using controls in your site
software.
Note that your site software will not combine multiple orders placed from
a punchout procurement system. Thus, if the buyer punches out to three
different products, three different orders are created, one for each punchout
product.
Note: You will set up and manage punchout buyers on the Punchout Buyer Management page. For more information on punchout buyers and punchout buyer management, see the topic Punchout Buyer Management.
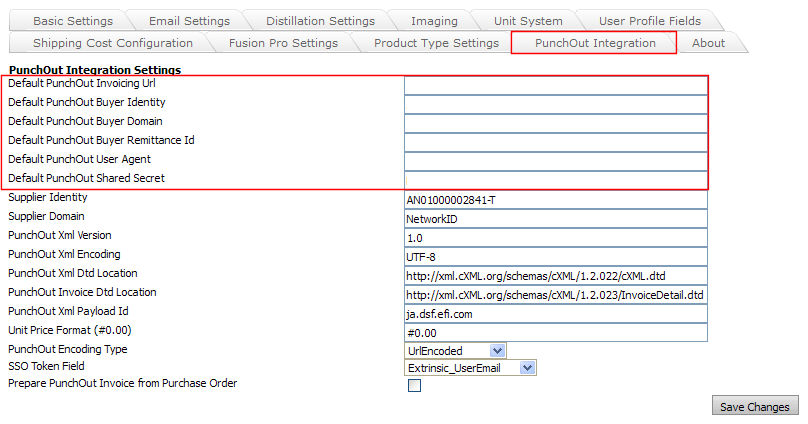
1. Configure the Punchout Integration settings:
Note:
Disregard the first 6 fields (i.e., those beginning with the word "Default").

● Supplier Identity: This is the unique ID the supplier was issued when it registered with the procurement web site (such as Ariba or Coupa).
Note: This supplier ID must be correct for punchout buyer integration to work.
● Supplier Domain: This is the domain of the supplier.
● PunchOut Xml Version: Accept the default value.
● PunchOut Xml Encoding: Accept the default value.
● PunchOut Xml Dtd Location: Accept the default value.
● PunchOut Invoice Dtd Location: Accept the default value.
● PunchOut XML Payload Id: Accept the default value.
● Unit Price Format (#0.00): Accept the default value.
● PunchOut Encoding Type: Data encoding scheme used. Select Url Encoded.
● SSO Token Field: This represents the field in the PunchOutSetUpRequest XML document that will be used as the your site user ID:
● Extrinsic UserEmail
● Extrinsic UniqueName
● FromIdentity
● SenderIdentity
● Contact Roles (for Invoice): Select the contact roles for the invoice.
● Unit Price Format (#0.00): Enter the price format.
● Generic Price Format (#0.00): Enter the generic price format.
● Add Minutes Manually to Invoice Timestamp: Specify the number of minutes to add to the invoice timestamp.
● Send Invoice: Select when the invoice should be sent: On Order Completion or Manually.
● Select Order Status for Sending Invoice: Select which order status will trigger invoicing.
● Prepare PunchOut Invoice from Purchase Order: When checked, all identity values (buyer and supplier) in the database will be ignored and the invoice header from the corresponding Order Request will be used.
2. Click Save Changes.
Note: For information on setting up a punchout buyer, see the topic Punchout Buyer Management.
3. In the SmartStore Templates Loaded for PunchOut Session section, click Edit and check the box in the Will be loaded? column for each SmartStore template to load for the punchout session.
Note: Click Restore Defaults to revert to all default values shown on this page.