Define or Edit Ticket Templates
To
create a ticket template
Note:
Changes made to the ticket
template will be applied imtely to products based on the template
on the Buyer side (i.e., without requiring you to go to the Products page
and republish the products based on the ticket template).
1. On the Manage Ticket Templates page click the radio button
corresponding to the template that most closely resembles the ticket template
you want to create.
2. Click Copy.
Note:
Copying an existing ticket
template then renaming it and modifying its specs as needed is often more
efficient than creating a template from scratch. To create a ticket template
from scratch, follow the steps in the section To
create (or edit) a ticket template in this help topic.
Note for entity administrators:
You can use the copy feature
to create a new ticket template. After
copying a ticket template and saving it with a new name, you will find
that all of the settings for the copied ticket template are carried into
the new ticket template except security settings (which will have the
default values that you can change as needed to suit the needs of the
new ticket template).
3. On
the Copy dialog, type a name for
the new ticket template in the Save as
text box.
4. Click
Save & Close.
5. Click
the radio button to select the new ticket template you created.
6. Click
Edit.
To
create (or edit) a ticket template
1. On
the Manage Ticket Templates page, click the radio button to select the
ticket template you want to define or edit.
2. Click
Edit.
3. On the Ticket
Template... page for the template, define or edit the template
using the following fields:
a. Ticket Template—You can change the
name of the ticket template here.
b. Step 1: Enabling buyer-supplied
content:
● Enter a heading
to label the first step the buyer will perform when building a product
based on this ticket template. This is what the buyer will see on the
storefront. E.g., “Add Files” or “Upload Content.”
● Enable
Introduction Text—Check this box and type any text you want to
display to buyers for Step 1 in the text box. This text can be descriptive
or instructional.
Note:
Most of the controls on
the text editor (e.g., cut, copy, paste, font selection, sizing, color,
etc.) will be familiar to users of word processing packages such as Microsoft
Word or Corel WordPerfect. A few of the controls that might not be so
familiar are:
Control |
Description |

|
This displays the text editor workspace in
design mode, which means it will be displayed WYSIWYG (“what you
see is what you get”). |

|
This displays the text editor workspace in
HTML mode, which means you can use standard HTML formatting tags
to define how your text will appear (e.g., <b>Sale!</b>
will cause the word “Sale!” to display in boldface on the storefront).
You can create hyperlinks to other web sites as well as to YouTube
videos. |
 |
This displays the text in the workspace without
any formatting controls. |
Note: The text is limited to
4,000 HTML characters.
c. Step 2: Specifying Available Formatting
Options for the Template:
Note:
Click to see how the options you specify here on
the ticket template will be displayed to buyers when ordering products
based on this template that use the Visual Product Builder (an enhanced
buyer ordering interface that combines ticketing with preview). For more
information on the Visual Product Builder UI (or the Flex Ticketing UI)
for ad hoc, static, and wide format products, see Creating
Products).
Note: Click to see how the options you specify here on the ticket
template will be displayed to buyers when ordering products based on this
template that use the standard (non-Visual Product Builder, or non-Flex
Ticketing UI) ticket.
● Enter a heading
to label the second step the buyer will perform when building a product
based on this ticket template. This is what the buyer will see on the
storefront. E.g., “Format My Job” or “Service Options.”
● Enable
Introduction Text—Check this box and type any text you want to
display to buyers at Step 2 of the ticketing process in the text box.
This text can be descriptive or instructional.
Note:
The text is limited to 4,000
HTML characters.
● Section—The
section name is the heading for the service category. Each service category
under this step will have its own section (e.g., “Print Options,” “Finishing
Options,” etc.).
Note:
To create a new service category, click New
Section. To delete a service category, click the  on the service category Section
panel. To arrange the service categories and print services in order on
the ticket, use
 to move the section or item up or down. To specify visibility
(to buyers) for a service category, select an option from the Section
Visibility pull-down list:
-- Always Expanded (to always show
all options to buyers)
-- Collapsed By Default (to have
the list of options collapsed by default)
-- Expanded By Default (to have
the list of options expanded by default)
● Add
Print Service(s)—Click this button to add a print service to this
service section.
Warning:
A ticket template should at a minimum
have the four print services listed below defined. If they are not defined,
orders for products based on the ticket template will require a manual
pricing quote and the job may not be finished as expected.
1. Require
File(s) from Buyer
2.
3. Print In Color/Sides with appropriate options selected
--OR--
Color or B&W
plus Simplex and/or Duplex
options selected
4. For ticket templates that use
continuous , you should offer the Final
Width & Height print service.
Warning:
Ticket Template Requirements for Booklet
Products: "Rules for Booklets"
1. The ticket template cannot contain
special pages.
2. The ticket template must have
duplex option selected. No simplex.
3. All must be of the same
physical size (e.g., for an 8.5 x 11 booklet, the interior and cover
would all need to be 11 x 17).
4. The ticket template cannot use
tabs/tabbed .
5. The ticket template must be
set up for a wraparound cover
if you want to give buyers the option of having a separate cover for the
booklet. Cannot have front or
back cover options, only wraparound cover option.
Note:
To delete a print service, click  on the print service panel.
● On the Add
Print Service(s) dialog: To select an existing service to add,
locate the service in the table (using the Search
field if needed), check its box, then click Add.
The service you added will open in the bottom of the section panel to
which you added it.
● Select
the print services you want to add to the ticket templates.
● Click
Add.
Note:
For products that will give buyers the option of adding tabbed pages:
Set up the ticket template that will be associated with products with a
tabbed page option to include:
(1) tabbed (see Catalog-Add
New for more details)
(2) the Tabs print service
Note
on Stapling and Collation: If your ticket template has a stapling
print service option, you should not
allow buyers to choose an non-collated output option. You can do this
by creating an intelligent (or conditional) ticketing rule that makes
stapling options incompatible with non-collation.
To create this rule:
1. Go to Administration > Print Services.
2. In the Print Service Category
field, select Staple.
3. Select all stapling print services in the list (by selecting the checkbox
in the far right column above the first stapling option in the list).
4. Scroll down and deselect the "No Stapling" option (i.e., make
sure the "No Stapling" check box is not
selected).
5. Click Edit Incompatibilities.
6. In the All Print Services list select Do
Not Collate, then click the right arrow to move it into the Incompatible
Print Services list. 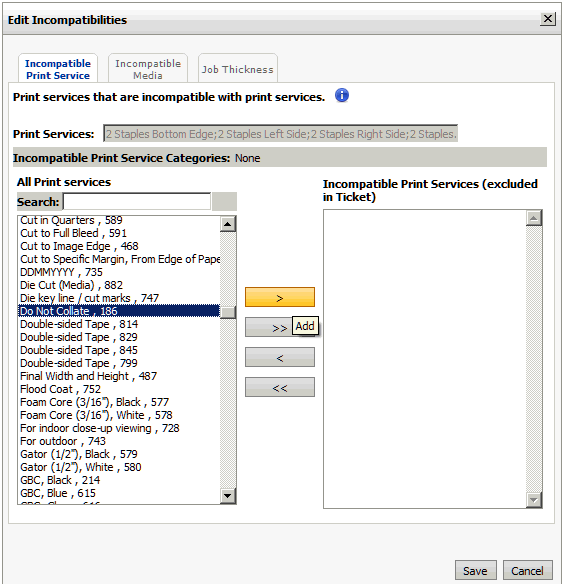
6. Click Save.
For more information on how to define intelligent ticketing rules at the
print service level, see Intelligent
Conditional Ticketing.
Note:
Mixed Impressions:
When the Mixed Impressions option
is enabled, ensure that you have enabled the Special Pages option for
the required on the Ticket Template page.
1. Go to Administration > Ticket Templates.
2. Open the target ticket template.
3. On the print service panel, click Configure.

4. Select the option Enable this Print
Service in Special Pages.

5. Select the required and Save
the ticket template.
Note: Now when buyers are configuring
the product in the product builder window, a special pages option will
be enabled that lets buyers select required pages as needed.
Note:
To select options and to make available as options for buyers ordering
a print service, click Configure
on the print service panel. Note that the page shows what the non-Visual
Product Builder (i.e., the non-Flex Ticketing UI) ticket will look like.
Please be aware that this is only a quick preview for you, the administrator,
to confirm that the expected options are turned on. For Visual Product
Builder UI products, the functionality is similar but the interface will
be different; some newer options do not even support the preview but may
summarize the options. Also, the preview is merely a simulation of the
buyer experience and so does not in any way change the ticket template
data, the default values that buyer will see, or control any units of
measure that a buyer may see. The only supported data that can be changed
to affect the buyer experience is exposed via the Configure
button; use only the Configure
button to change default or related settings as permitted.
Warning:
A ticket template should have one (1) and only one duplex option specified.
Thus, if you have the Sides option
set to "Double Sided" you should not have a duplex option available
(i.e., turned on) for any other
print services (such as a Tabs print service option with an option for
buyers to choose "Double-Sided (duplex)."
Having a duplex option available in a
ticket template for more than one print service is not a supported practice
and will cause problems in the pagination system and lead to pricing calculation
errors.
● Click
Configure to configure the print
service.
● On the configuration
dialog, select the options you want to make available for the print service.
● To hide the print
service from buyers when ordering on the Visual Product Builder, select
the Hide from Buyer (Hide on Visual
Product Builder) option.
● To enable the
print service to be used in special pages, select the Enable
this Print Service in Special Pages option.
● Click
Save.
● :
By default, available for a product are displayed to buyers in alphabetical
order. To change the order in which options are displayed to buyers
ordering products based on the template:
● Select
the print service and click
Configure.
● After
selecting the options to add to the template, select the you
want to reorder in the Display Selected Options panel.
● Set
the Display Priority for the selected
.
Note:
Setting the display order of the in this way will enable you to
set the more common options closer to the top of the display for
buyers who are ordering the product. This is especially useful for products
whose templates have many options. For example, using the default
alphabetical ordering, “US Letter, White” would be much farther down in
the list for buyers than “A3, Fire Engine Red, Vinyl.”
Note:
Note on Final Width and Height: To
use the standard final width and height setting when setting , you
must associate any products that use the standard finished size with a
ticket template that supports the Standard
Final Width and Height options
(for more information, see To
create (or edit) a ticket template). The finished sizes will then
be available for you to select on this page.
Note:
This reordering function is available for all print services that use
(e.g., tabs, front cover, back cover, special pages). Reordering
in existing products will not affect the default you specified
for the template.
● Set
the Scale to Fit option for the
print service (for cases in which the buyer's file and the selected
are of different sizes):
● Allow
scale to fit option, default unchecked: Allows
buyers to select an option to fit their content to the selected
and have the option unselected by default.
● Allow
scale to fit option, default checked: Allows
buyers to select an option to fit their content to the selected
and have the option selected by default.
● Hide scale
to fit option: Do not allow buyers
to select an option to fit their content to the selected .
● Hide
scale to fit option (force scaling): Do not allow buyers to select
an option to fit their content to the selected and force the scaling
when needed.
● Click
Save.
● If
you want to scale files to the selected size when needed, select
the Scale my files to fit paper (when
needed) option.
● Special
Pages: After you create a print service, you can enable it for
special pages by clicking Configure to open the print service dialog and then
checking the Enable
this Print Service in Special Pages box.
Note:
Special pages are pages in a job to which customers can apply special
formatting options (different from the rest of the document). By using
the special page options on the storefront a customer could choose among
other things a heavier stock for certain pages or a different size .
For example, if the Ticket Template has both the and Orientation
print services enabled for Special Pages, a buyer could set up a document
with Tabloid-size in landscape orientation on page 1 and Letter-size
in portrait orientation for the remaining pages of the document.
For more information on combining the Binding Edge print service with
the Orientation print service, see Sample
Use Case: Combining Binding Edge and Orientation (with Special Pages Enabled)
Print Services.
Note that not all print service categories support special pages.
Notes on Subset Stapling:
If your ticket template has a subset stapling print service option, it
is strongly recommended that you enable special pages only for subset
stapling and disable special pages for all other print services.
d. Step 3—Setting job approval requirements
and pricing summary access:
● Enter a heading
to label the third step the buyer will perform when building a product
based on this ticket template. This is what the buyer will see on the
storefront. E.g., “Approve My Job.”
● Enable
Introduction Text—Check this box and enter any text you want to
display to buyers for step 3 in the ticketing process in the text box.
This text can be descriptive or instructional.
Note:
The text is limited to 4,000
HTML characters.
● Requires
Job Approval before being submitted—Check this box to require buyer
approval (i.e., buyer confirmation) to continue with the order process
for jobs based on this ticket template.
● Show
Pricing Summary—Check this box to enable buyers to view a pricing
summary for a job based on this ticket template.
● Show
Special Instructions to Buyer—Check this box to enable buyers
to view special instructions for this ticket template.
e. Ticket Template Security: Assigning
ownership and access rights for the template: In this section of the ticket
template builder you can assign an owner for the ticket template and set
permissions to restrict access to the template. This lets you make the
template available to one user group but not to another.
Note:
This section of the template,
of course, will not appear to buyers on the storefront.
● Default Security
setting allowing “everyone” to use and manage: Choose this option allow
all users (i.e., in the “everyone” group) to use the ticket template and
only the designated owner to manage the ticket template.
● Custom
Security Settings: Choose this option to customize security and
limit who can use and manage the ticket template.
● In
the Owner field, click Change
to add or change who owns (manages) the template.
● On
the Select Owner dialog:
● In
the first drop-down select the category of user to assign ownership of
the template to: Groups, Users, or Companies.
● The
search field (  ) will help you
locate the group or user you are looking for, and the Show
field will limit the number of items displayed.
● Click
the group, user, or company to assign ownership to.
● Click Add
User, Group, or Company.
● On the Select
Security Principal dialog:
● In
the first drop-down select the category of user to whom to assign access
to the template: Groups, Users, or Companies.
● The
search (  ) field will help you locate
the group or user you are looking for, and the Show
field will limit the number of items displayed.
● Click
the group, user, or company to assign access to. The selected user, group,
or company will display on the ticket template in the Access
Permissions table. You can grant users the right to Use
the ticket template (i.e., create products based on the ticket template)
and/or Manage (modify) the ticket
template.
Note: You
can retract access permissions at any time by clicking Remove
for the user, group, or
company in the Access Permissions
table.
●
f. Click
Save to save the ticket template.
Sample
Use Case: Combining Binding Edge and Orientation (with Special
Pages Enabled) Print Services
The
Binding Edge print service category lets buyers choose to
specify on which side certain pages in their documents should
be bound—left, right, or top. This is useful for jobs in which
buyers use the Orientation print service to specify that certain
special pages (e.g., those that are of a different size) are
to be produced in a different orientation from the other pages
in the document.
Note:
Binding edge orientation
is not supported
for jobs with tabs because tabs are always generated assuming
a left binding edge.
An
example will illustrate:
Buyer
has a 24-page bound document that she wants to be printed
as follows:
● Pages
1-2 are to be produced on Letter-size , portrait orientation,
and coil-bound on the left edge
● Pages
3-4 are to be produced on Tabloid-size , landscape orientation,
folded, and coil-bound on the left edge (these pages will
be a fold-out)
● Pages
5-24 are to be produced on Letter-size , portrait orientation,
and coil-bound on the left edge
Using
the Binding Edge print service in combination with the Orientation
print service (with special pages) will eliminate issues with
the dynamic preview of the job, which would be problematic
if for instance all pages in the job were set to bind on the
long edge, etc.
The Binding Edge print service on the Manage Print Services
page:
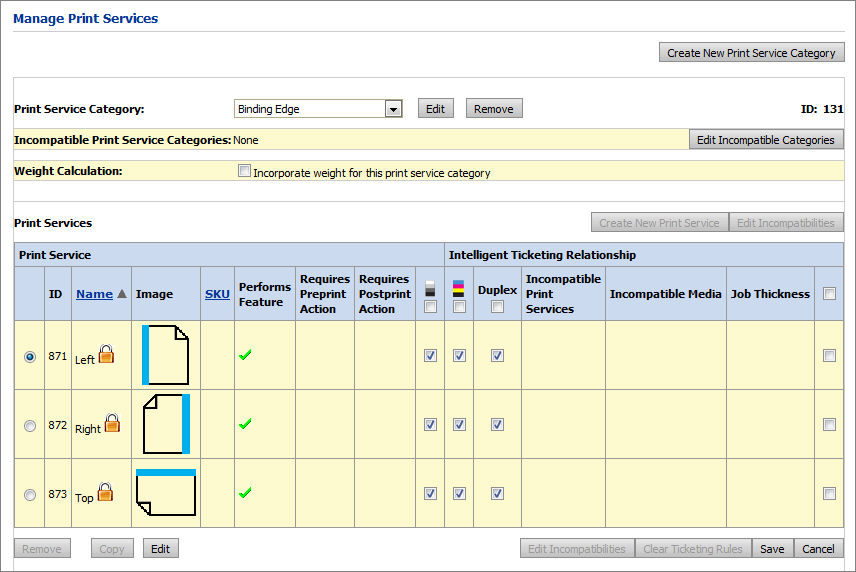
Note:
For information on how to set up print services, see Print
Services.
To
give buyers the option of using these job setup options, ensure
that the ticket template associated with a product has special
pages enabled for and Orientation print service and
the Binding Edge print service.
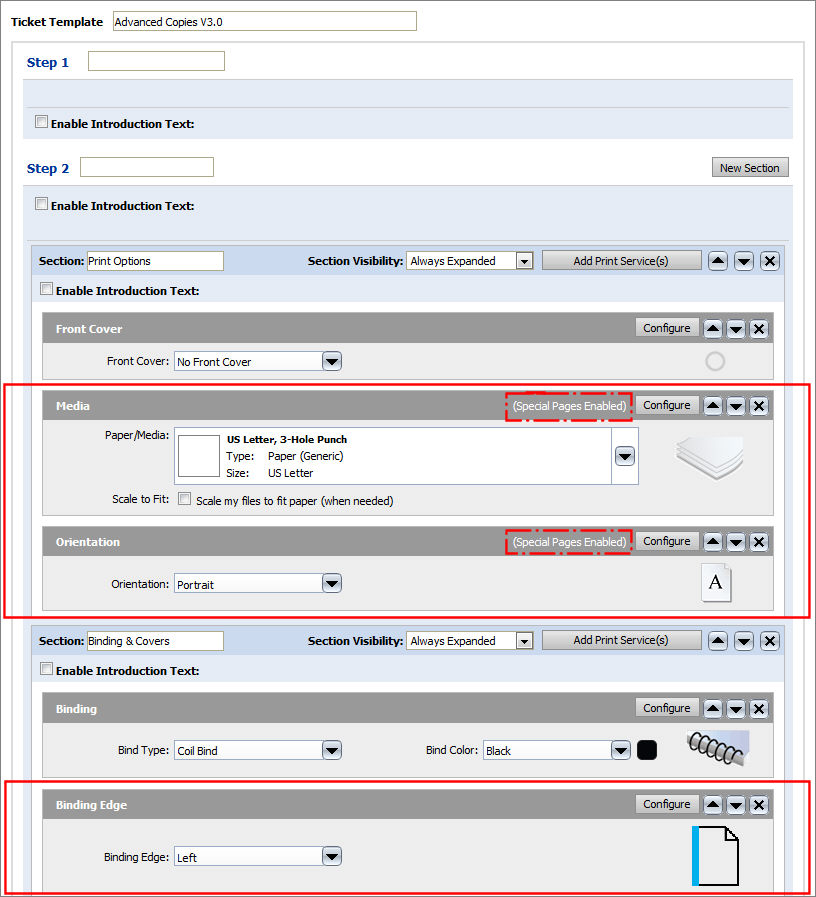
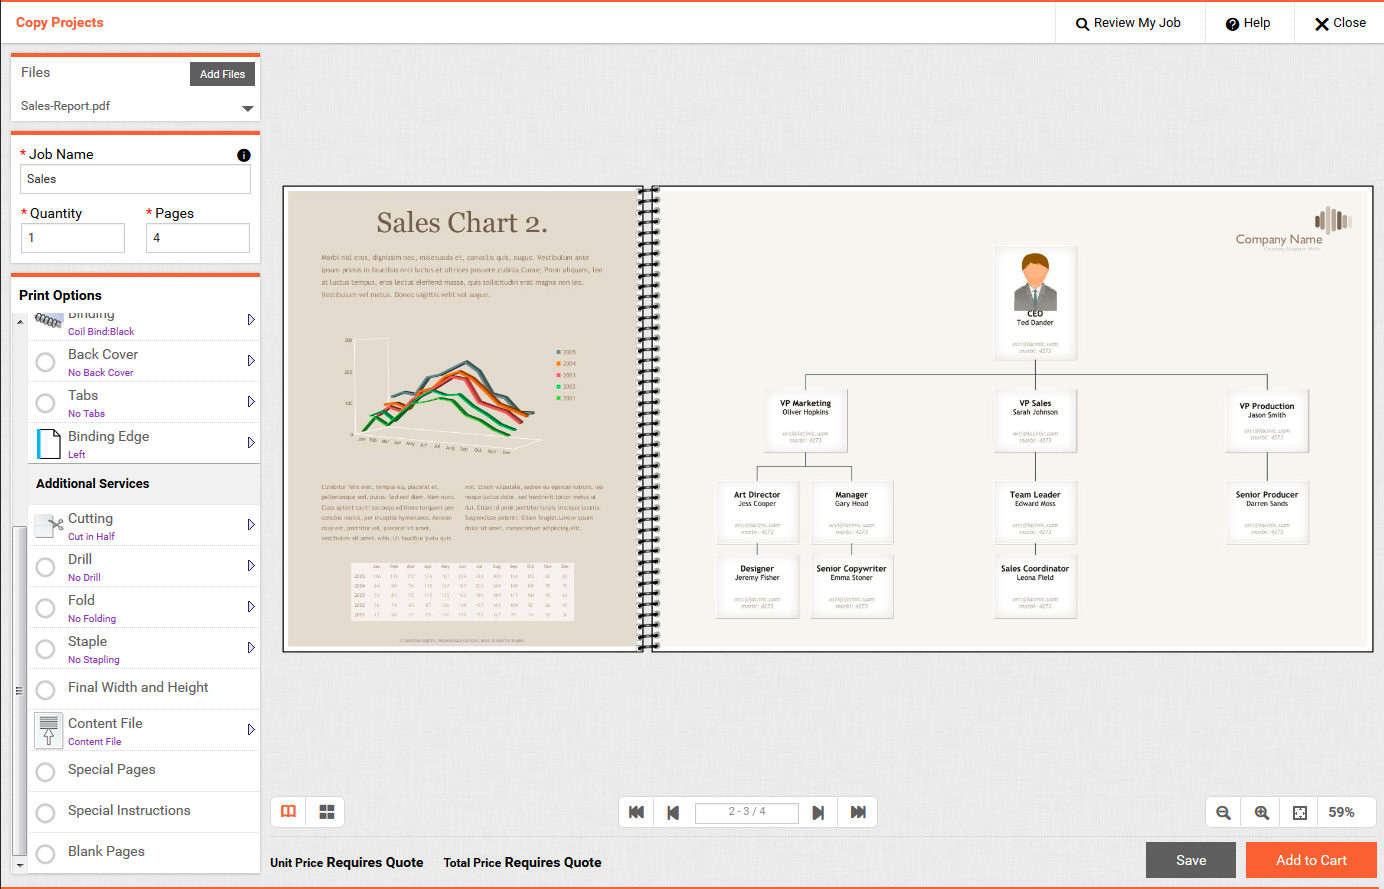
With
these options enabled in the ticket template, buyers can configure
special pages with binding edge, orientation, and .
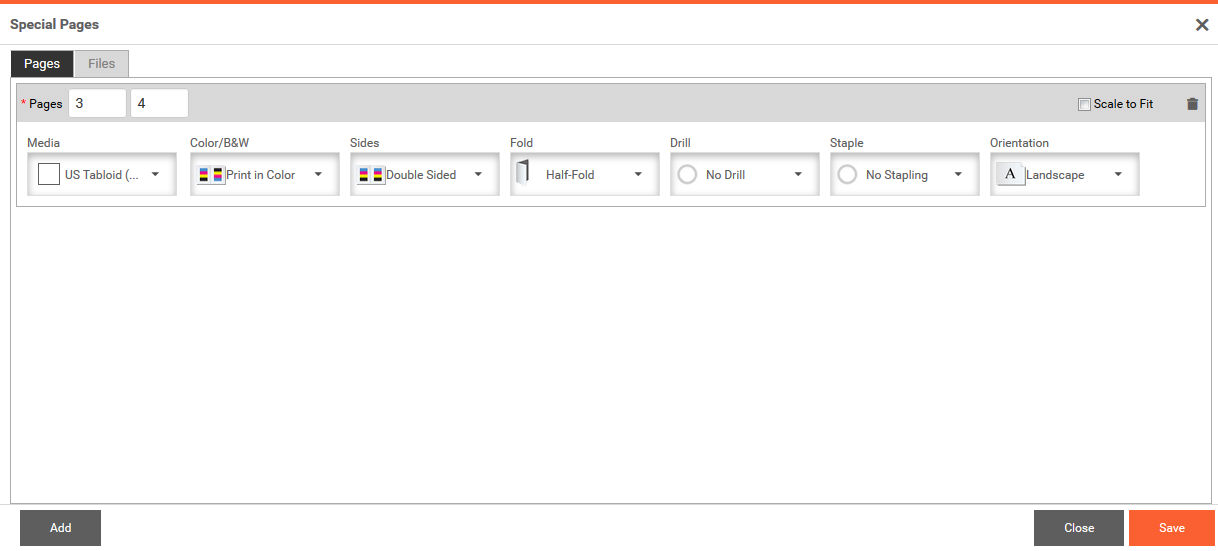
The preview will reflect the
buyer's mixed size, orientation, and binding options.
|
See Also
● Ticket
Templates Overview
● To
view or change the ticket template associated with a product
● Product
Management Contents Page
![]()
![]()
![]()


